Average response time: under 24 hours
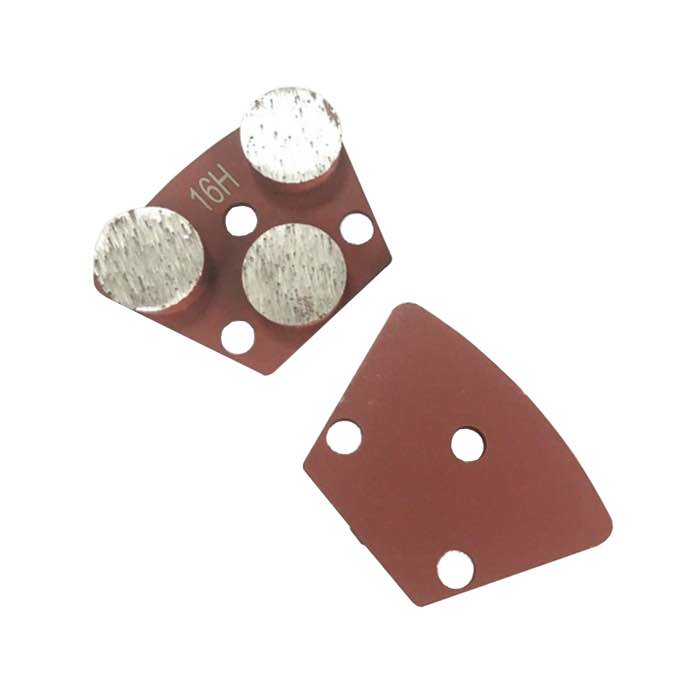
A cold joint ridge is the raised, feathered edge left where a later concrete pour met an earlier, stiffer slab. Before a coating, grind these ridges flat until the transition reads as a smooth plane, typically within 3 mm over 3 m, or tighter if the coating datasheet demands. Use a hard-bond diamond at shallow passes, not a deep gouging bite, and stop as soon as the ridge is gone to avoid scrubbing through the whole slab. Expect about 30 to 60 minutes per 10 m of proud joint on average concrete.
Cold joints show up as a narrow ridge, crack line, or feather edge across a slab where two pours met, often near a construction joint, a day-stop, or a patch. Run a straightedge along the line and you will feel one side sit higher than the other. The ridge may be only 1 to 5 mm proud, but under a thin coating it reflects as a visible bump or a film that bridges and cracks over the high edge. Walk the whole slab with a straightedge before booking tooling, because the ridge hides under dust and old sealer until you open the surface.
A ridge is a step between two elevations; a shrinkage crack is a narrow fissure in one plane. Grind ridges down, but treat cracks separately with cleaning and filler, because grinding alone will not close a fissure and may widen it. Mixing the two problems leads to a half-fixed joint, so label each defect on the chalk line before the grinder starts.
Film coatings such as epoxy or polyurethane need a flatter substrate than thick broadcast systems. A self-leveling overlay can bridge small height differences, but most thin films magnify any step above about 1 mm, so read the coating spec before you decide how flat to grind. A decorative flake floor shows every ridge; a heavy-duty broadcast forgives more, which is why the system choice comes first.
Start with a hard-bond metal diamond at 30/40 or 60 grit, chosen so the abrasive dresses rather than glazes on the slab. Take shallow passes across the ridge, overlapping by half the wheel width, and keep checking with the straightedge. Forcing a deep bite risks gouging a hollow in the adjacent slab that you then have to grind out. Work from the high side down onto the low side so the machine never drops off a sudden step, and feather the transition on the low side rather than grinding a second ridge across it.
Most decorative and industrial coatings call for a flatness around 3 mm in 3 m measured with a straightedge or laser, and thin film systems sometimes ask for 2 mm in 3 m. After grinding, sweep the straightedge across the joint in both directions. Any gap under the edge shows a remaining high spot that will telegraph through the coating. Do not rely on visual inspection alone, since the eye forgives low spots that a roller will coat unevenly, and a high ridge you miss today becomes a callback next quarter. Mark each remaining high spot on the floor with a pencil dot and grind those dots until the straightedge reads clean across the line. Keep a log of which joints were ground, so the coating crew knows where movement may appear and where extra film thickness will not save a step left proud.
Once the ridge is flush, the joint line is still a plane of weakness and movement. Clean out any laitance left from grinding, vacuum the joint thoroughly, and decide whether the coating can span the line or whether you need a flexible joint filler. For most thin coatings, a neat, flush transition with no high edge is the goal; the coating itself will cover the faint line left by the former pour boundary. Where movement is expected, fill the saw-cut control joint rather than the cold joint, and let the coating bridge the old pour boundary cleanly. A well-prepared joint should read as a faint line once the film cures, not as a shadow or a step, and any remaining roughness tells you the blend pass was too shallow.
Filling works for low spots, but a proud ridge must be ground down; filler on top of a high edge will itself become a bump under the coating.
The film bridges the step, flexes with slab movement, and cracks or delaminates at that line within months, showing exactly where the ridge was.
A 10 m ridge raised 3 mm usually takes a skilled operator about 30 to 60 minutes of grinding plus blending, depending on slab hardness and machine reach. Add another 20 minutes for straightedge checks and cleanup, and price the joint on its own line item rather than folding it into the floor rate.
Written and reviewed by JOY TECH - an SGS & BV audited, CE/RoHS certified diamond tools manufacturer founded in 2004, exporting to 50+ countries.
Our factory and quality management system are audited by SGS and Bureau Veritas. Products meet CE/RoHS requirements and every piece is 100% inspected before packing.
Verified Certificates
