Average response time: under 24 hours
Grind a concrete patch flush with the surrounding slab in thin passes of 0.2 to 0.5 mm per pass, start with a soft-bond metal-bond diamond disc on a planetary grinder, and feather 100 to 150 mm past the patch edge on every lap. Check the transition with a 2 m straightedge between passes; stop when the gap reads under 0.5 mm. Do not try to remove a 10 mm bump in one pass, because the tool will glaze, overload the motor, and leave a spiral that shows through sealer. Browse the grinding tooling range before you price the job.
A patch rarely sits perfectly flush when it is floated. Concrete slumps, screeds high, and trowel work leaves the new pour 1 to 5 mm proud of the old slab. Under polish, that proud edge becomes a bright line because the tooling cuts the soft new paste first and leaves the harder old cement matrix behind. You cannot polish a patch flat; you have to grind it down deliberately, and the earlier you touch it, the less material you remove. Waiting two extra weeks for full cure doubles the work because the patch gains strength the longer it sits.
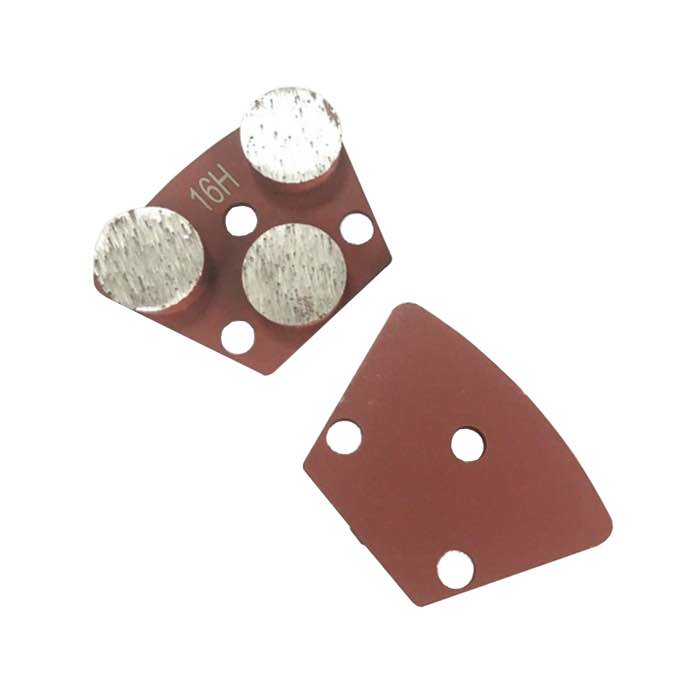
Fresh patch concrete is usually a 30 to 40 MPa repair mix, often with a latex modifier. It grinds fast but loads the bond. Use a soft-bond, fine-grit metal segment that wears quickly and exposes fresh diamond, rather than a hard-bond segment meant for cured 70-year slab. The triple-round segment trapezoid from JOY TP-R3 tooling carries three round segments that cut a flat, swirl-free patch and wear evenly on variable concrete hardness. Running the wrong bond wastes half a day: hard bonds glaze on soft patches, soft bonds wear out twice as fast on dense repairs.
Wait at least 7 days after the patch pour for foot traffic and light grinding, and 28 days before aggressive stock removal or any resin-polishing step. Grinding too early pulls the surface paste out and leaves a ragged profile that cannot be closed later. If the patch is a rapid-set repair, follow the bag data sheet; some products reach grind strength in 4 hours. For epoxy-modified repairs, add another 48 hours of cure before any open grinding.
Never stop the grinder exactly on the patch boundary. Overlap the cut 100 to 150 mm onto the old slab on every lap, alternating direction. This feathering avoids a visible step and blends density differences between the two concretes. Plan on three to five overlapping passes before you switch to finer grit. Mark the patch boundary with chalk so you can see the overlap shrink as the high spots come down.
After the last metal-bond pass, switch to a transitional resin pad to close scratch pattern across the seam. The goal is a surface where the straightedge rocks by less than 0.3 mm over a 2 m length before sealer or polish goes down. If the patch sits in a high-traffic aisle, take one extra feathering lap; traffic amplifies any tiny height difference as a visible wear line.
The classic mistake is taking one deep pass to chase a high spot. That glazes the diamond segments, burns the paste, and digs a low pocket beside the patch. The second mistake is ignoring slab curvature: patches near control joints crown more than the field, so blend radially outward from the joint. A 180 mm arrow-segment cup wheel on an angle grinder, like the JOY CW-A12 wheel, is handy for tight corners but must never be the main tool on a large patch, because it leaves directional swirl that shows under polish.
Cap each pass at 0.5 mm of material removal, and let the machine weight do the work; pressing down does not speed cutting, it just loads the motor and flattens segments. On a 10 mm proud patch, budget 8 to 12 passes, not two. Keep the vacuum on, because wet grinding a patch stains the surrounding cured slab and adds a day of drying time. Watch the amperage; a loaded motor slows and the cut rate collapses.
Done means the straightedge reads under 0.5 mm across the seam, the scratch pattern is uniform on both sides, and a wet-look test (splash water) shows the same reflectivity on patch and old slab. If a faint outline remains after polishing, it is almost always a height issue, not a resin-grit issue. Mark that outline, grind the seam again, and re-polish; do not try to hide it with extra sealer.
Empty the dust bin every 30 minutes, inspect segments for glazing, and dress the tooling on an abrasive block if it starts skating. Rinse the patch area once blending is complete, and keep foot traffic off for 24 hours before sealing. Document the starting straightedge readings in the job file, so the client can see exactly how much material was removed and why the patch blended smoothly.
Matching a patch to floor height is a patience job: shallow passes, soft-bond tooling, feathered edges, and straightedge checks every two laps. Rushing the first deep pass is the one move that guarantees a visible line through the finished floor. Take the extra laps early and the polished result will hide the repair completely, with no ghosting under sealer or epoxy.
Written and reviewed by JOY TECH - an SGS & BV audited, CE/RoHS certified diamond tools manufacturer founded in 2004, exporting to 50+ countries.
Our factory and quality management system are audited by SGS and Bureau Veritas. Products meet CE/RoHS requirements and every piece is 100% inspected before packing.
Verified Certificates
