Average response time: under 24 hours
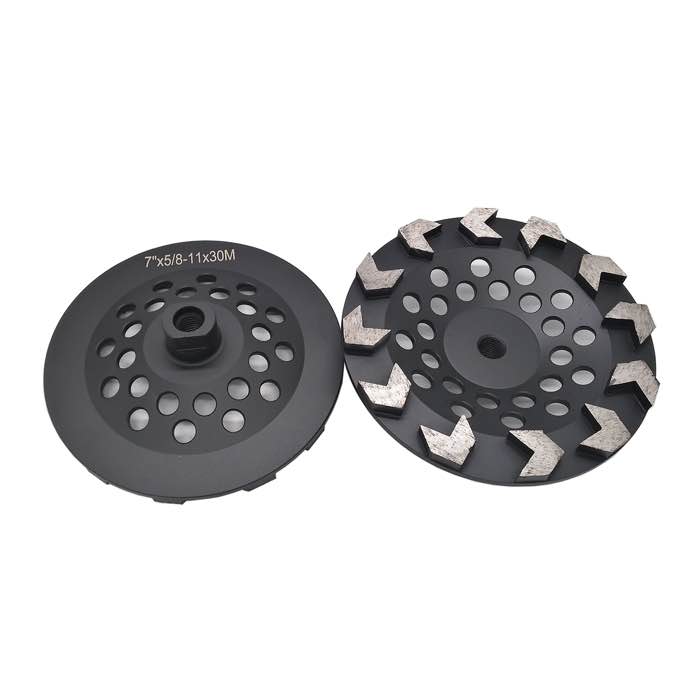
To remove a sidewalk trip hazard, find the lifted edge — usually a slab that has settled or a joint where one side stands proud — mark the high area, and grind it down with a walk-behind or handheld grinder fitted with a coarse diamond disc until the step is below about 5 mm (the common trip-hazard threshold is roughly 6 mm or 1/4 inch, and many jurisdictions enforce less). Feather the grind well past the joint so the transition is a gradual ramp. Sweep the dust, and seal the ground surface if the sidewalk will be stained or exposed to weather.
Sidewalk slabs settle, heave, or shift, leaving a vertical lip at the joint. The standard trip-hazard threshold is a change in elevation of about 6 mm (1/4 inch); below that, the step is usually passable; above it, the sidewalk is a liability. ADA guidelines and many municipal codes enforce specific numbers, and courts treat a visible raised joint as a hazard even below the nominal threshold. Measuring with a ruler or feeler gauge at the joint tells you whether grinding is enough — steps over about 12 mm may need slab replacement or a concrete patch ramp instead.
For a sidewalk joint, a handheld grinder with a diamond grinding cup wheel handles short sections, and a walk-behind grinder is faster for long joints. Use a coarse wheel (metal bond or coarse cup) — the goal is stock removal, not finish. Check the slab for embedded metal before grinding: sidewalk joints sometimes carry dowels or mesh that will destroy a diamond wheel. A metal detector pass is cheap insurance on unknown sidewalks.
Work dry with a dust shroud and vacuum, or wet where runoff is acceptable. Dust from sidewalk grinding is silica — protect yourself and bystanders; see concrete grinder dust collection hookups for the setup.
Grind from the high side down to the low side, feathering the cut 200-400 mm past the joint so the transition is a long gentle ramp instead of a step. Work in shallow overlapping passes — a single deep grind cuts a trough that collects water. Check the profile constantly with a straightedge across the joint: when the straightedge sits flat and a 5 mm gauge slides under without catching, the hazard is gone.
Move along the joint in sections, re-checking each section after grinding. Sidewalk joints are often high at one end and level at the other; grind only where the gauge catches, and leave level concrete alone. For a very long joint, mark all the high spots first, then grind them in one pass along the line so the transition is consistent.
Sweep and vacuum the ground area thoroughly — the dust packs into the joint and washes into soil. If the sidewalk is exposed to weather and staining, seal the ground section with a penetrating concrete sealer so the surface matches the surrounding concrete and sheds water. On old sidewalks, the ground patch will look lighter until the concrete weathers; that is normal and harmless. If the joint gap is open, fill it with a flexible joint sealant after grinding so water does not widen the crack.
Finally, walk the repaired section and roll a wheeled cart or suitcase over it. If it catches, grind a little more. The repair is complete when nothing catches — that is the test a plaintiff's expert would use.
A coarse double-row diamond cup wheel removes the lip fast on long joints.
Grind the high side down until the step is below about 6 mm (1/4 inch), the common trip-hazard threshold, and feather the transition. Steps over about 12 mm may need a patch ramp or slab work instead.
A handheld grinder with a coarse diamond cup wheel for short sections, or a walk-behind grinder for long joints. Use a dust shroud and vacuum for the silica dust.
Measure the step with a ruler or feeler gauge. Under about 6-12 mm, grinding fixes it; larger steps need a concrete ramp, a patch, or slab replacement.
It is good practice. A penetrating sealer protects the ground surface from weathering and staining and helps it match the surrounding concrete. Fill open joints with flexible sealant.
Removing a sidewalk trip hazard is a measurement job and a careful grind: measure the step, grind the high side with a coarse diamond wheel in overlapping passes, and feather the transition until a straightedge and a 5 mm gauge pass clean. Clean up the dust, seal the ground surface, and walk or roll over the repair to confirm it catches nothing. A flat, ramped joint is safer, complaint-proof, and invisible to the eye.
Written and reviewed by JOY TECH - an SGS & BV audited, CE/RoHS certified diamond tools manufacturer founded in 2004, exporting to 50+ countries.
Our factory and quality management system are audited by SGS and Bureau Veritas. Products meet CE/RoHS requirements and every piece is 100% inspected before packing.
Verified Certificates
